By now many of you have seen the new “Google Sitemap Verification File” option under “Search Engines” in your store manager. If not, then go take a look, I’ll wait…
One of the more powerful features available in Google Sitemaps is the ability to specify which host name is your “Preferred domain” in the Google index. This helps “concentrate” your listings at Google if you have pages showing up under both “store.yourdomain.com” and “www.yourdomain.com.” However, there is a catch: If you have not set up your store’s “custom 404 error page,” Google Sitemaps will not allow you to specify a preferred domain.
So here’s the plan:
- Create a custom 404 page
- Enable the 404 page in the Store Manager
- Add the Google Sitemaps Code & verify
- Specify your preferred domain
Create a custom “404 error” page
A “404 error” is simply a “page not found” error. By default, a Yahoo! store will redirect a request for a broken link to your store’s home page. While this behaviour is better than *some* responses to a bad page request, it can be improved. You’ll probably want to spend some time optimizing your “page not found” page, as what your visitors see can determine whether they stay or leave your site!
In any conference session at SES or WebmasterWorld where “404 error” pages are mentioned, Apple’s error page comes up as an example of “how to do it right.” There are only a few key guidelines for an effective “404 error” page, and Apple has them all covered, namely:
- Make sure the user knows the page they were looking for was not found.
Here’s where Yahoo!’s default behaviour can be confusing: If you have a broken link on your site, it can often be more helpful to let the user know there is a broken link than to simply drop them on the home page.
For example: If you have moved your top selling “Blue Widgets” section page, and several of your long time customers have that page bookmarked, their bookmark will now land them on the home page. Not too annoying, but also lacking in any confirmation that their bookmark is no longer working the way it should.
By contrast, a custom error page will indicate that the old bookmark or link is no longer working, and, in the case of the top selling “Blue Widgets” either provide a link directly to the content the visitor is looking for, or allow them to search for it.
- Provide clear links to “Top Content” areas of your site.
Make sure there are direct links to your most important and most requested content. If the content is popular, there is a good chance it was what your visitor was looking for in the first place.
For inspiration on your store’s top content, take a look at the “Searches” and “Sales” reports available in the “Statistics” column in your Store Manager.
- Provide the ability to search directly from the “404 error” page.
If your “Top Content” links aren’t enough, make it easy for your visitor to search for what they want.
Even if a “search box” is part of your overall store template, put an additional “easy to see” search box on your “404 error” page.
- List alternate contact options.
If you have additional means of customer support available, then say so! If someone is on your “404 error” page and the “Top Content” links and search features haven’t resolved their issue they may want to know where to go next. If you have phone support, list the number and the available hours. If your business has “brick & mortar” locations then provide a store locator. Many sites also have live chat support, or a contact form for support issues.
When you have the content for your page ready, create a new page for your store and give it an appropriate id like “404-error.”
For the most part, your “404-error” page will be like any other page on your site. You can usually put your “Top Content” and search box in the “Caption” field. More help with “404 page” theory is available from Yahoo!’s help pages.
Enable the 404 page in the Store Manager
Figuring out what to put on your “404-error” page is the hardest part. It’s all downhill from here. A few check boxes and a couple copy/pastes and we’re done!
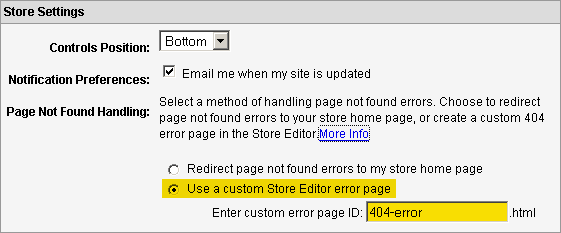
Now that you have a “404-error” page, it’s time to enable it in the Store Manager. Click on the “Preferences” link under the “Site Settings” column:

Once you’ve changed your settings, you’ll need to publish your order settings to make the changes “live.” Now you’re ready for the Google Sitemaps code.
Add the Google Sitemaps Code
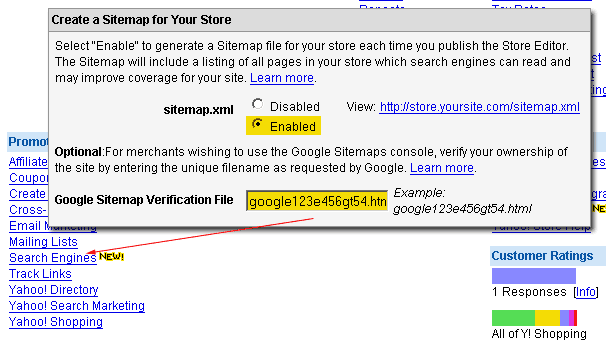
Head over to the “Search Engines” link under “Promote” in your store manager and enter your Google Sitemaps code in the box provided. You can use the “Preferred Domain” feature regardless of whether or not you actually enable the site map function. Your choice there!

Make sure you publish your order settings, then go back to Google and verify your Sitemaps code.
Specify your preferred domain
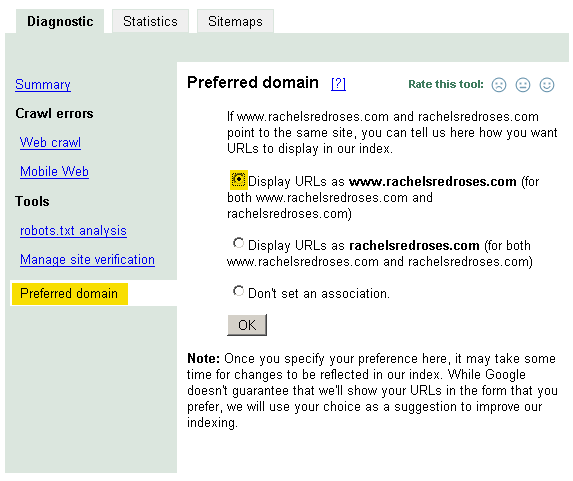
Now that your Yahoo! store has a proper “404 error,” you’re ready to specify your preferred domain. In the Google Sitemaps interface, click the “Preferred Domain” link at the bottom of the left nav, and take your pick.
Most of the time, you’ll want to use “www.” or “store.” as the preferred domain name. A good rule of thumb is to use whatever version of your domain name that has the most inbound links pointing to it.


